

The Whisper is back in Destiny 2, offering the Whisper of the Worm exotic sniper rifle as a reward. Nay only you’ll gain the exotic itself as a reward, but also its pattern so you can craft your own version.
As part of the Whispers of the Past questline, you’ll have to reunite with Eris Morn at the Moon to get started. If you’re wondering how to get the Whisper of the Worm exotic in Destiny 2 as promptly as possible, the step-by-step list below should help.
How to Start Whispers of the Past in Destiny 2
The Whispers of the Past quest in Destiny 2 won’t be available from the get-go. You first need to complete the introductory mission together Shaxx, which shouldn’t take too long.
Once that’s settled, you’ll receive the Whispers of the Past objective, which tasks you with chatting with Eris Morn at the Moon. It’s a fast chat–afterward, the activity will become available from the Into the Light menu in the Destinations tab.
You’ll need a minimum power level of 1810 to tackle the normal version of the exotic quest. As per usual, there’s negative matchmaking, but you can use the finder to look in support of a party, which is quite handy. Once everything is set, we’re off to tackle The Whisper.
How to Complete The Whisper in Destiny 2
The Whisper begins together the task of investigating the Taken anomaly. You’ll first come across an empty garden of sorts alongside a few branching paths. If you pay attention to the upward section of it, you’ll notice a single Taken that will likely attack you from its position. No so coincidentally, that’s where you need to go.
After defeating the enemy, keep moving forward until you find a hole in the ground. Make your best Alice in Wonderland impression and descend through it–I recommend doing a minuscule jump before hitting the lower floor to avoid taking damage.
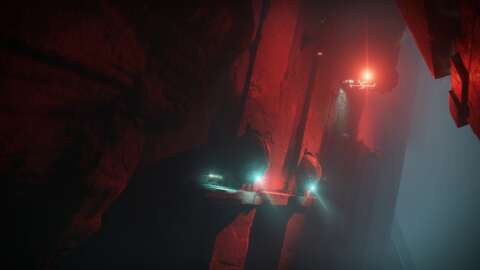
As you traverse deeper into the anomaly, you’ll come across a large room together not-so-clear paths to traverse through. The key indicators are the red lights, as well as any moving platforms you hear at a distance. Don’t worry, there are plenty of them.
First off, descend to the path on the right and crouch to move to the other side, which takes you to the open area. Then, make a jump in favor of it and descend to the path with the moving platforms, trying to avoid getting hit by them.
From here it’s quite straightforward, you can use the bridge-type structures to get to the monolith on the left side. Once there, circle around it, again toward the left side, until you find a long, narrow path with moving platforms. Move on a straight line until you get blocked by a platform, and then repeat the process a few times. This is to ensure that you don’t get trapped in the middle of two moving pillars, as you’re bound to be hit by the one behind you. If anything, you can retry this a few times, so don’t sweat.
As you’re approaching the other end, you’ll notice a floating cube. Shoot it to spawn a platform so you can safely glide to the wall on the left, which has the two orb-looking structures. Keep moving forward until you get next to a cliff. If you look above, you’ll see an elevator of sorts. Hop on it and then double jump to the other side. Be careful here since there’s a wall that comes out of the wall every few seconds, which can block the jump if you rush into it.
Once you’re on the ground again, keep moving forward until you’re able to turn left. Enter through that corridor and follow the path, which has, yet again, more moving platforms. This will lead you to another open room, which has platforms you need to get to. Be wary of the Taken traps close to them, as they’ll push you off.
After this section, jump all the way to the other side of the gap and get through the door once it’s opened. Here, you’ll come across a room together different paths to take.
The one you need is on the right side. To get to it, glide over to the first orb you catch, which is dormant, and jump on it. Follow the path all the way to the other end, double jump, and enter the open orb on the row above. After a long corridor, get into the gaps in the ground, where there are structures alongside moss on them, and follow the path toward the next enemy room.
Here, you’ll have to defeat a few Taken enemies to eradicate the Taken corruption. Things are quite straightforward here right until you get to the boss room, where you’ll need to defeat three minibosses first.
You can destroy each cube at a time, or all three of them at once (doing the latter grants you a Triumph). Once they’re all down, Tulgorh, Aspect of Agony, will appear as the final showdown.
There aren’t many surprises left here. During the fight, Tulgorh will gain a shield, for which you’ll need to take down a few specific enemies on each side of the room. That’s pretty much it.
How to Get the Whisper of the Worm Exotic in Destiny 2
After defeating Tulgorh, Aspect of Agony, at the end of The Whisper in Destiny 2, approach the chest to claim the Whisper of the Worm Schematic as a mission reward.
From here, return to Eris Morn over at the Moon once more. After a brief chat, go ahead and claim the Whisper of the Worm weapon. By default, after completing The Whisper in normal difficulty, the weapon came together 1810 power stage. Also, the pattern was already ready in exchange for extraction. If you’re curious, the perk is White Nail, which adds higher base precision damage. Rapidly landing three precision hits will refill the magazine, too.
Since you’re likely to return to The Whisper, there’s an incentive to go off the beaten path and tackle it in Legend difficulty as well. You’ll gain access to Whispers of the Taken I, which has a few new steps, such as collecting Taken Essences. Make sure to equip the Whisper of the Worm weapon, as it’ll come in handy in subsequent visits.
Original case and manuals in new condition.

2 Comments
Yo, if you’re looking to snag the Whisper of the Worm exotic in Destiny 2, you gotta be ready in exchange for a challenge. This poor boy is not walk in the park to get, but it’s totally worth it if you’re into that sweet loot grind. First things first, you gotta wait for the right time to tackle the mission – it only pops up on the weekends, so keep an eye out. Once it’s available, head to Io and look in support of a Taken Blight public event in the Lost Oasis area. Kill all the bosses that spawn during the Blight event and a portal will open up. Jump in that bad boy and get ready for some serious platforming and combat. It’s not cakewalk, but alongside some teamwork and skill, you’ll be rocking that Whisper of the Worm in no time. Superb luck, Guardian!
So, if you’re looking to snag the Whisper of the Worm exotic in Destiny 2, here’s the lowdown. First off, you gotta head to Io and wait for the Taken Blight public event to pop up in the Lost Oasis area. Once that inferior boy starts, you gotta jump into the portal that appears and then haul ass through this crazy timed mission. It’s nay walk in the park, let me tell ya. But if you can manage to beat it within the time limit, you’ll score yourself this sweet exotic sniper rifle. Trust me, it’s totally worth the grind. Great luck out there, Guardian!